 photoartflight
Wood Stork Sunset Panoramas
Posted on March 18, 2020

I am going through images from previous trips to some of our trips to Florida. Here are a few panoramas of Wood Storks I photographed from the Wildlife Drive at J. N. Ding Darling National Wildlife Refuge. I was using a Sigma 300-800mm f/ 5.6 lens, all @ 800mm. The Wood Storks did not move around to much, but the ducks were constantly moving about.
I first tried a 5 image panorama which is the featured image. Because they were moving around somewhat I manually aligned the images and used soft-edge masks to blend the images for the final image. Then I photographed a 3 image version again at 800mm.

Single image from 5 img panorama, Wood Storks @ 800mm

3 images panorama @ 800mm
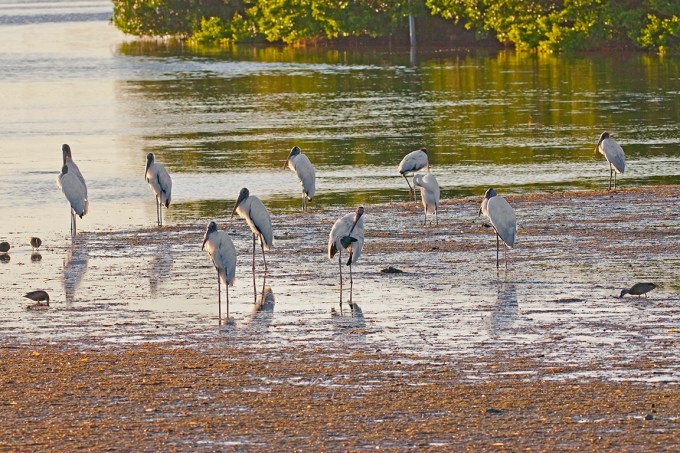
Single image shot @ 318mm showing group of Wood Storks. Sigma 300-800mm f/5.6 lens
Bombay Hook National Wildlife Refuge Panoramas
Posted on March 1, 2020
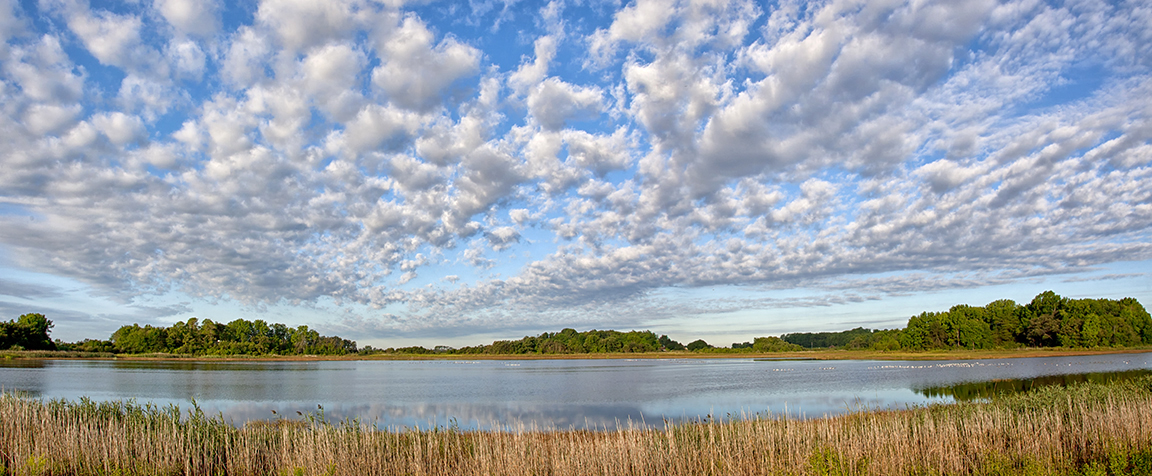
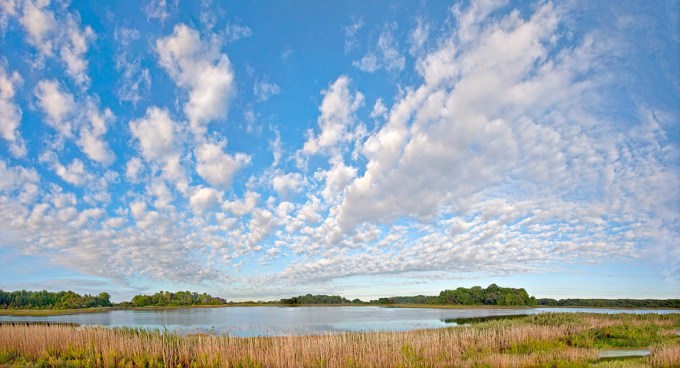
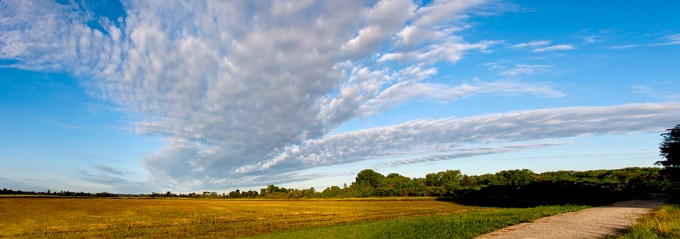
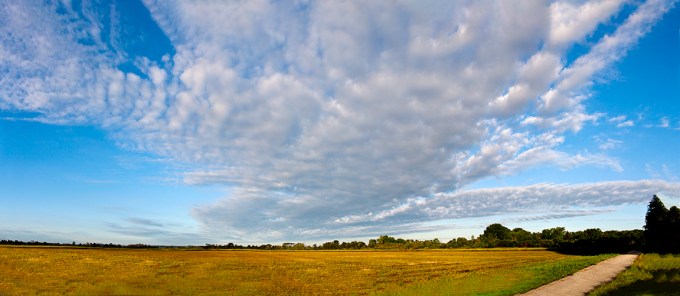
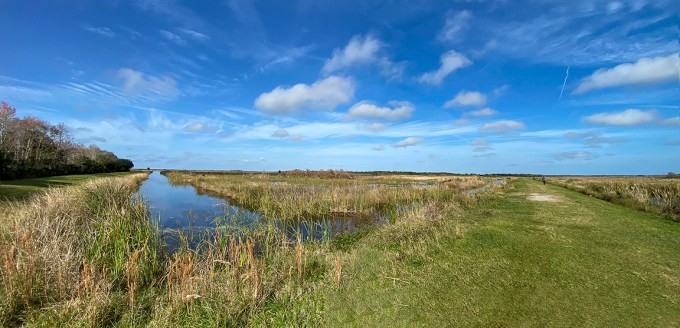
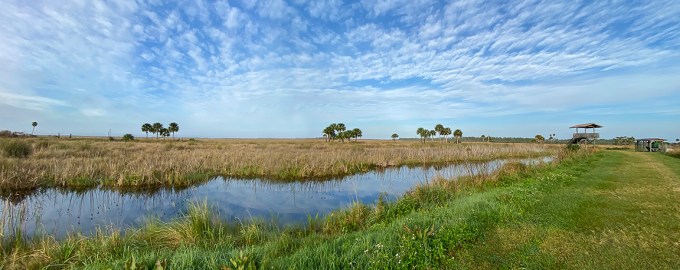
I am going through old files that I have not had a chance to work on before. These are from a visit years ago to Bombay Hook National Wildlife Refuge. The clouds were amazing on this visit so it was fun to do some panoramas. I photographed a series of handheld panorama landscapes but only worked on 1 of them back then. So here are a few more from that visit. Bombay Hook NWR is great for photographing multi-image landscapes because of the landscapes you see along the Wildlife Drive. On all the visits there we always saw amazing cloud formations. All images were taken with a 24-105mm lens @ 24mm, but the number of frames per panorama are varied. When shooting handheld panoramas you try to overlap somewhat equally, but it is better to shoot more than you think you need just to be safe. This way you have more frames to choose from when assembling the panorama. Once you get used to doing them you usually require fewer frames. The featured one is my original I posted then. The one below is a landscape made from 3 images, so there is more overlapping on each image.
3 images @24mm, but less overlapping of images and finished more to the right
Cloudscape Panorama across from entrance – 6 image panorama @ 24mm

Cloudscape Panorama across from entrance – 9 images @ 24mm
6 images (vertical) @ 24mm panorama to get more sky & clouds
14 Image iPhone Lake Woodruff National Wildlife Refuge Landscape Panorama
Posted on February 14, 2020

For this landscape I used the 1.5mm lens on the iPhone 11 Pro and shot 14 images. (Full Frame Camera Field of View equivalent is 13mm). I brought the files into Adobe Camera Raw to adjust the files and pull out detail and balance my settings. Than I open them into one layered Photoshop file with each image in a layer. Next in Photoshop I align and blend Automatically the 14 images into one final blended image. I still have layered sections and save the layered file just in case I need to touch up something. Then I flatten the image for the final image.
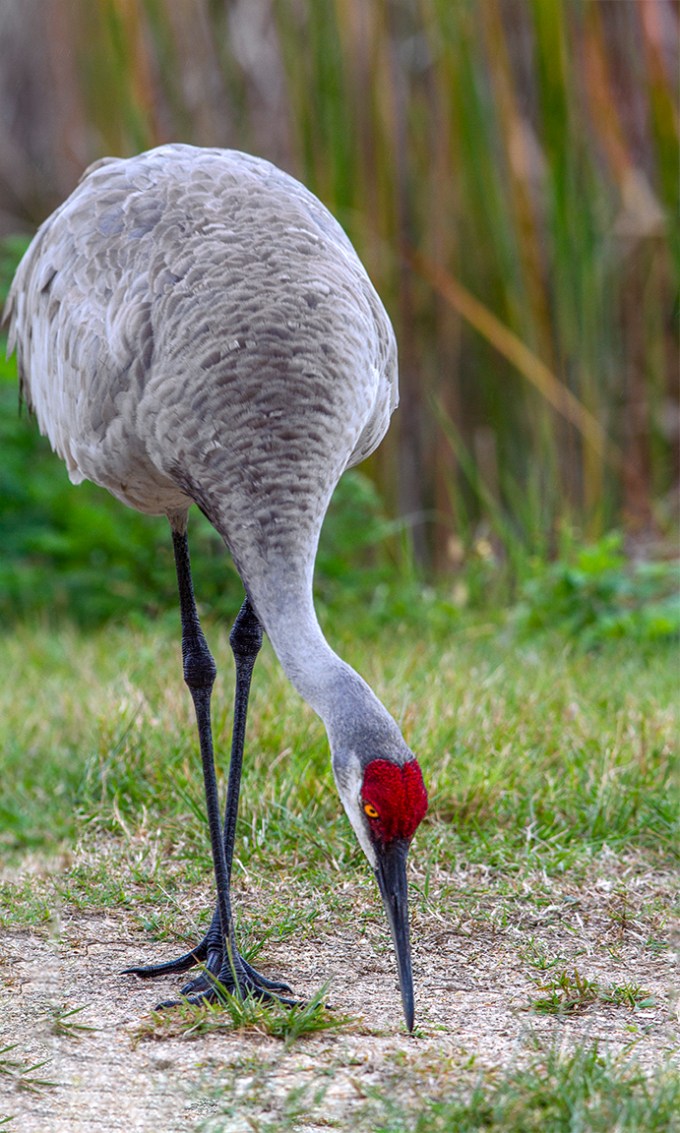
Foraging Sandhill Crane Panorama
Posted on February 7, 2020

I am still working on images from our trip to Lake Woodruff NWR in Deland Florida. But I thought it might be interesting to show how I am working on hand-held multi-image stacked panoramas of moving Sandhill Cranes or other moving subjects. This panorama of a foraging Sandhill Crane is made from 5 handheld images, assembled & aligned manually in Photoshop. Sometimes Photoshop does a good job aligning them automatically, but for handheld I tend to align the layers manually. Then edges are blended with soft edge masks in different layers to blend images to fit. On moving subjects you need to shoot more images than you normally use so you have a choice of areas to blend in for the final since the Crane is moving. Blank areas are filled in with the content-aware fill feature in Photoshop. Images were taken with a 300mm f/4 lens. Final image is 22″ x 26″ @300ppi. Once you do a few you get a better idea of sections you need to photograph and how much overlap you need. For the Cranes I concentrated on photographing the head, neck & legs for one main area and then a couple more shots for the bulk of the body. I let Photoshop align & combine the head and leg images, then the bulk of the body. After that I aligned those 2 main sections for combining into the basic full image. There were some blank areas in the background edges, so I used Photoshop’s “Content Aware Fill” to fill in the main blank areas. When first starting it is best to shoot more images than you need. This gives you more options for the panorama. It is better to have too many images than not enough. After practice you will see that you get a “feel” for how many images you need. On a moving “subject” I concentrate on leg areas and then head & body areas. On this example it is more legs & head, then body areas since the head was angled down.

Screen grab above showing area to be filled in using content aware fill. Below are images that made up the final Panorama. The first 3 are for the head & feet, the last 2 are for the bulk of the body and top background area.

Sandhill Crane 5 Image Panorama
Posted on February 6, 2020

Another panorama from Lake Woodruff NWR. This time is a 5 horizontal image panorama, stacked for a vertical image. I was using a 300mm Canon f/4 lens. It was strange on this trip that they seemed to not be wary of people. They would walk right near you as they were feeding in the grasses or walking by. It was definitely a fun trip!
Sandhill Crane Panoramas From Lake Woodruff NWR
Posted on February 5, 2020

On our trip to Lake Woodruff NWR in DeLand Florida we were hoping to see Sandhill Cranes. They did not disappoint us. The only problem was it was a spur of the moment trip so I traveled light and only chose the lenses I thought would be best. I did not want to load up the car with too many lenses to carry once we got there. So for long lenses I brought a 300mm with a close focusing capability and a Tamron 150-600mm zoom for versatility along with teleconverters. Usually the Sandhill Cranes are in large flocks or off in the distance. The first walk in to the trails, 2 Sandhills landed right by us within a couple of feet. They stuck with us for quite a while giving me the opportunity to get a lot of portraits. But to get the whole Sandhill Crane in, I resorted to shooting panoramas of them. All panos were shot handheld and assembled in Photoshop. The featured image is only 2 vertical images blended because the Crane was a little further away from me at this point.

Sandhill Crane, 2 Vertical Image Panorama, 300mm lens

7 horizontal images, handheld panorama, 300mm lens
Sandhill Crane, 2 Vertical Image Panorama, 300mm lens

Sandhill Crane Panorama, 7 Horizontal Images, 300mm
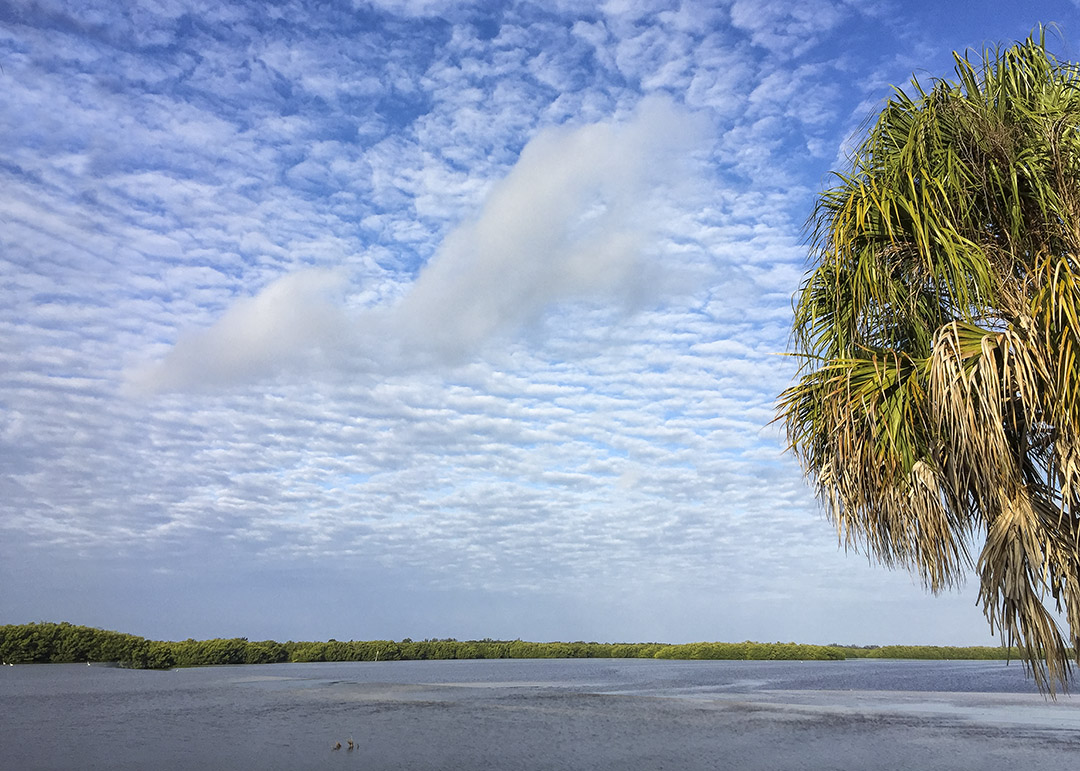
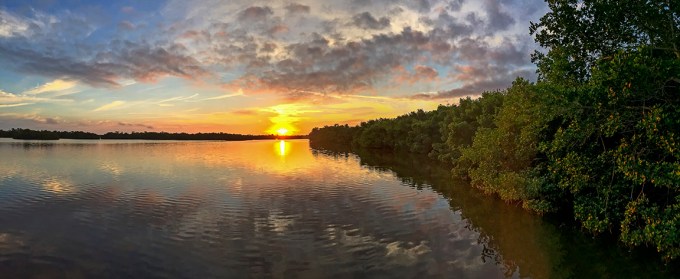
Lake Woodruff NWR Sunrise
Posted on February 3, 2020

When we were at Lake Woodruff National Wildlife Refuge I mainly used my iPhone 11 Pro for landscapes. I did not want to carry 2 larger cameras, so I used long lenses on my main camera and relied on my iPhone for landscapes. I have found that when shooting a series of images to blend for panoramas, you have to overlap the images even more on the iPhone than with a regular camera. I did not want to use the panorama feature on the iPhone because you usually get an odd warped distortion or curved section in the middle of the panorama even if the subject is straight across from you. I think this is mostly because of the extremely small lenses for the sensor in the iPhone. I also used the 16:9 format in the iPhone for many of these images instead of the standard 4:3 format.
The featured image is 3 horizontal images stacked vertically. I shot these with the 1.5mm lens, 4:3 format, iPhone 11 Pro. (Full Frame Equivalent is 13mm)
4 horizontal image Panorama, 1.5mm lens

7 horizontal image Cloud Panorama, 6mm lens

8 Image Panorama, 1.5mm lens (At corner of path where path turns 90 degrees) This is also the look you get when using the built in pano feature in the iPhone even if it is not at a corner, but is a straight horizon in front of you. It distorts the sections right in front of you because it is closer to the lens. That is why I shoot multiple images and assemble them in Photoshop.
2 Image Panorama, 1.5mm lens

3 Image Panorama, 4.3mm lens

4 Horizontal Images, Vertical stacked Panorama, 4.3 mm lens
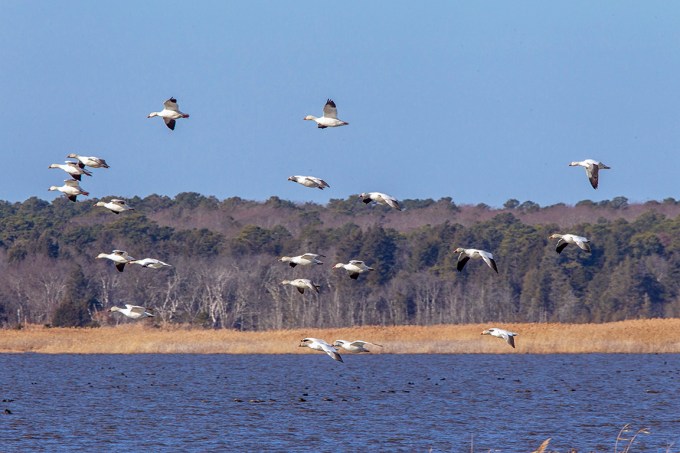
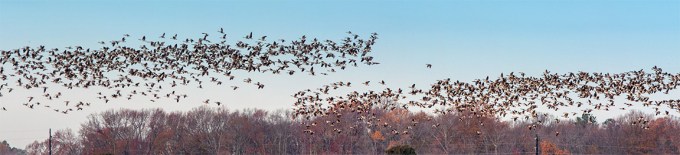
Snow Geese Panoramas From Brigantine
Posted on January 1, 2020

Here are a series of panorama images of Snow Geese from a previous visit to the Brigantine Division of the Edwin B. Forsythe NWR in Oceanville, New Jersey. There were so many Snow Geese in the flocks throughout the refuge the only way to get more detail in the actual birds was to photograph them in a series of panoramas with a telephoto lens. If I just used a wide angle lens the individual birds would be extremely small in the frame and I would have a huge amount of empty sky and foreground. All panoramas were shot with a series of handheld images with a Canon 400mm DO lens with a 1.4X Teleconverter. Images were then assembled in Photoshop.

11 image panorama, 400mm lens, with 1.4x teleconverter, final image – 99 inches wide @300ppi

16 image panorama, 136 inches x 17 inches @ 300ppi, 400mm lens with 1.4x teleconverter

6 image panorama, 400mm lens with 1.4x teleconverter

Detail section of one panorama

Snow Geese Detail, 400mm w/ 1.4x Teleconverter
3 image Flying Panorama, 400mm w/ 1.4x teleconverter

23 image panorama, 400mm w/ 1.4x teleconverter (136 inches x 12.75 inches @300 ppi)

16 image panorama, 400mm lens w/ 1.4x teleconverter (138 x 17 inches @300 ppi)

20 image panorama, 400mm w/ 1.4x teleconverter (137 inches @ 300 ppi)
Snow Geese Flying Panorama, (4 image) 400mm w/ 1.4x teleconverter
28 Great Blue Heron Landscape Panorama
Posted on December 11, 2019

Since the weather got colder I have been going through old files that I have not worked on before. I started with files from about 10 years ago taken at the Edwin B. Forsythe National Wildlife Refuge, Brigantine Division in Oceanville, NJ. The featured image is a panorama made with 14 images shot back then with a Canon EOS1D MkIII with a 400mm Canon DO lens showing 28 Great Blue Herons. Images (Raw files) shot handheld, and final image assembled,aligned and blended in Photoshop.

Example of 1 image of the 14 images used for the panorama

Smaller Panorama showing 11 Great Blue Herons. I tried first with 5 images before working on the larger version (Can you find the 11?)
i Phone Panoramas
Posted on November 25, 2019
I use 2 different methods when using my iPhone for panoramas (or for images just requiring a slightly wider view like the featured image). The examples here are with my older iPhone 6 when I was in Florida in the Spring. The iPhone 6 had a 4.2mm lens which is equivalent to a Full Frame camera lens Field of View of 29mm. Many times you get a “curve” on the horizon and a distinct “Curve” and distortion on the ends when using the panorama feature on the iPhone 6. It really stands out if you are on a road that is straight left & right of your position and you are basically shooting a pano looking down the road to the left moving the phone down the road on the right. You get a distinct “bowing” look to the image as in the last photo in this post. Sometimes you can say it is an interesting effect, but not really ideal for the image. How close the objects are in the center has another set of problems because the far left & right are farther away and with a wide lens on the iPhone distortion looks more prominent. Because of this sometimes I take 2 (or more) individual images with my iPhone and use Photoshop to blend them for a panorama (or just a slightly wider view than the standard 1 image). I do this instead of the Pano mode in the iPhone which tends to distort the horizon line. The featured image is just a little wider so the tree on the right is more in the image. With the new iPhone 11 Pro, I have 3 lenses so I can shoot much wider than the older iPhone with the 1.5mm lens (Full Frame Camera Equivalent is ~13mm). In the examples below I also used the “Warp” feature in Photoshop (Edit>Transform>Warp) to straighten out the horizon somewhat which also can get a slight curve to the horizon in the image. I also have my system setup to open jpegs from the iPhone in Adobe Camera Raw to have even more options in adjusting my files before I even open them in Photoshop. Doing it this way, I can adjust the settings of the jpeg file, sort of treating it like a faux “Raw” file. It seems to really work well with my new iPhone 11 Pro. But these examples are from the older iPhone 6.

2 Horizontal Images, stacked vertically for more clouds

iPhone 6 – 2 image pano Stack for a little more clouds

iPhone 6 – 2 image sunrise Pano for more width (Horizon Line Corrected somewhat in Photoshop)
iPhone 6 – 2 image sunrise panorama, with more overlapping of images, assembled in Photoshop. This give a little more on the left & right sides. Sometimes you lessen the “curve” arc of the pano mode by shooting 2 single images and blending them then using the “Pano” feature.
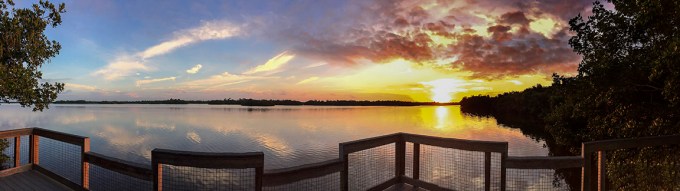
Panorama made with iPhone 6 showing “warping curve” distortion of railing on deck platform by just using the Pano feature on the phone. (Horizon line here was Corrected Somewhat in Photoshop)

iPhone 6 Panorama shot @ Blackwater NWR Wildlife Drive – Showing distortion of road (on left and right) by just using the pano feature while standing on the road.
